Tutorials about Capture One, raw-processing software.

Although it's not as well known as other digital imaging software such as Lightroom, Aperture or DXO, Capture One is undoubtedly a benchmark tool in its field. It is published by the Danish company Phase One, known in the world of photography for its digital backs.
To know more...
Capture One users have generally chosen this tool for the following reasons:
- The quality of the dematrixing and the excellent colour rendering, particularly flesh tones.
- Capture One offers a choice between managing photos by catalogue (like Lightroom) or by folder. This second solution is far preferable for those who work on several machines and therefore need to move photos to another folder or copy them to another computer.
- Capture One offers particularly powerful tools for straightening verticals, Architectural photographers will appreciate this.
Available Tutorials in english.
These tutorials do not use presets but only basic settings. They are therefore easily transposable to other demosaicing software such as Lightroom.
Capture One Tutorial. Getting started with Capture One.

This tutorial will help you get started with Capture One, the software that converts RAW files generated by your camera into JPEG format.
This conversion stage also gives you the opportunity to fine-tune your photography by adjusting parameters such as exposure, eliminating any dominant colours,
or removing small defects such as a smudge on the sensor or a pimple on a face, etc.
Capture One Tutorial. Sharpening with Capture One.
Sharpening encompasses all techniques aimed at visually improving the sharpness of photos.
The aim is not to sharpen photos whose blur is the result of a problem during shooting (camera shake blur or focus blur),
but to correct imperfections linked to the hardware (the lens and the sensor), as well as those resulting from the use of post-processing software.
Capture One offers several techniques for improving the sharpness of an image, and we're going to explore them in this tutorial, while comparing their impact.
Capture One Tutorial. Compare before and after.

It is always beneficial, at several points in the post-processing process, to compare the modified image with the original.
This practice often prevents excessive adjustments. Capture One offers a variety of methods for carrying out this comparison
either on a specific parameter or on all the adjustments applied.
This tutorial compiles the different methods available, including options for permanently undoing one or more adjustments.
Capture One Tutorial. Remove an element of the decor.

In this tutorial we're going to learn how to hide distracting elements in post-processing that couldn't be removed when the shot was taken.
To do this, we will use correction layers and duplication layers.
Capture One Tutorial.Change colors.

In principle, you don't ask derawtisation software to change colours, at most to allow a slight adjustment.
However, Capture One's tools are advanced enough to allow this type of manipulation: changing the colour of an item of clothing, substituting blue eyes for green ones,
giving the sky a psychedelic orange hue, and so on.
In this tutorial, you'll discover Capture One's colour editor, a very powerful tool.
Capture One Tutorial. Converting to B&W with Capture One.

In an age when digital and video dominate the visual media, it's fascinating to see that black and white photography continues to hold
an undeniable appeal for many enthusiasts. This timeless aesthetic highlights the subtle nuances of light, shadow and contrast.
The methods for converting a colour image into a black and white image vary according to the software used,
each offering specific tools and approaches. Among these software solutions, Capture One stands out for its rapid
conversion method and its ability to provide meticulous control over the final result.
Capture One Tutorial. Adjust white balance with Capture One.

Here is a method for adjusting white balance using Capture One.
It is applicable when an element of neutral colour is present in the image. This is often the case in the studio when using white, grey or black
backgrounds. These specific backgrounds are characterised by the absence of any dominant colour.
If the background used is coloured, or more generally, for photos taken in a natural setting,
photographers with foresight photograph a greyscale during the session.
This greyscale photo is used to determine the white balance parameters, which are then applied to all the photos in the session.
Capture One Tutorial. Brightness adjust with Capture One.

Brightness adjustment is one of the settings that is almost always optimised during the dematrixing phase.
This is all the more necessary in the case of a photograph presenting both very bright and very dark areas.
In other words, it's a high contrast image, such as you might find in the case of a subject dressed in white and black,
or a married couple, the husband sometimes dressed in black and the bride more often in white.
By using the appropriate tools in Capture One, you can selectively adjust the light and dark areas, restoring a visual balance, preserving
the colours and essential detail in both highlights and lowlights.
Capture One Tutorial. Simulate a cross-processing with Capture One.

Cross-processing (or cross-development) involves developing a film with chemicals normally intended for another type of film.
This is of course in the case of film photography, but the term is also used in digital post-processing.
The result is an image characterised by pronounced coloured highlights and shadows.
This tutorial uses the capture One colour editor to carry out cross-development.
Capture One Tutorial. Perform a partial desaturation.

Partial desaturation is a well-known technique in which a photograph is transformed into black and white, with the exception of a single colour
which remains visible. This approach aims to create a visual impact by highlighting a specific element in an image, often to convey a message
or draw the viewer's attention to a key focal point.
The popularity of this technique has led to many examples where it has been misused, applied without any real artistic thought
or simply overused. As a result, its original appeal has faded for some, and can appear contrived or uninspired.
Nevertheless, here's a tutorial on how to achieve partial desaturation easily with Capture One.
Just don't overdo it.
Capture One Tutorial. Dodge-and-burn with Capture One.
Dodge-and-burn is one of the most widespread techniques used in photographic retouching.
Its aim is to add depth to an image, intensify contrasts, improve the quality of light, shape the contours of a face, emphasise the relief
of a landscape, and much more.
Performing Dodge-and-Burn with Capture One is particularly easy and intuitive. It all starts with the creation of two layers
layers: one for darkening (Dodge) and one for lightening (Burn).
Using these layers, you can specifically target the areas you want to brighten (Burn) or darken (Dodge), applying
the corresponding adjustments. This technique gives you precise control over brightness levels, while guaranteeing a natural rendering
without abrupt transitions. This tutorial explains in detail how to do a Dodge and Burn with Capture One.
Capture One Tutorial. Dramatising the sky.

We often have to process a sky that appears too washed out, with clouds that struggle to stand out clearly.
In such situations, a common method is to slightly underexpose the sky, which can considerably improve its visual visual reproduction.
However, the difficulty lies in preserving the exposure of the rest of the photo.
The solution of creating a mask over the part of the sky you want to retouch can be time-consuming and laborious,
especially when the sky is next to complex shapes such as vegetation.
This tutorial shows you how to use Capture One's built-in colour editor.
The job can be done in about ten seconds and doesn't require any tedious, painstaking cropping.
Capture One Tutorial. Quick editing.

Selecting photos can be a tedious and time-consuming process, especially for photographers who take a lot of photos.
You need to identify which photos will be kept and developed, and which will be deleted.
Capture One makes this job easier by automatically managing the movement of images
into the corresponding folder (Capture, Selection or Trash).
It is also possible to apply a note or a coloured tag to each photo to refine the classification of images.
Capture One Tutorial. Balance exposure.

Sometimes, particularly in studio shots, the exposure may not be uniform throughout the photograph.
For example, a model's legs may be underexposed in relation to her face. This disparity may be due to a light source that is
poorly positioned or simply too small.
This problem can also occur outdoors when natural lighting is limited, such as through a window, or when elements,
create shadows on part of the photo.
Capture One offers a quick and effective solution for balancing exposure between different parts of a photo, whether between the top and bottom
of the image or between left and right: local settings with gradient mask.
Capture One Tutorial. Generating images for publication on the Internet.

Before publishing a photo on social networks, or more generally on the Internet, it is advisable to prepare the image for this use:
reduce the resolution, choose a colour space compatible with the screens of all Internet users, opt for a standard format such as JPEG,
include a credit note to identify the author, etc.
Capture One Tutorial. The different histograms.

The histogram is of crucial importance for photographers working in digital format, particularly during the post-processing phase.
It has many uses: firstly, it simplifies the adjustment of exposure and luminosity by providing a visual representation of the distribution
of luminance values within the image, but it is also useful for adjusting contrast.
Capture One offers no less than four histograms, each with its own purpose. This tutorial describes each of these graphs in detail and how to use them.
Capture One Tutorial. Embedding a watermark.

When the JPG or TIFF file is generated, Capture One can add a watermark to your photos.
The watermark can be a signature, your studio logo, a "Reproduction forbidden" notice, etc.
A watermark is often added to photos intended for publication on the Internet or social networks.
Naturally, this will not deter malicious individuals from appropriating the photo (using it without the author's permission),
because the watermark can be easily removed. However, the watermark identifies the origin of the image and remains linked to it when it is
is shared on social networks or republished on the Internet.
Capture One Tutorial. Remove sensor tasks.

Dust or stains on the sensor can ruin a photo session. Fortunately, there are solutions for removing them in post-processing
but this still involves working on each photo.
It is therefore essential to clean the sensor regularly, and in any case as soon as you notice a defect.
To save a 'dusty' session, Capture One offers not only a tool for quickly and easily erasing stains, but also
a solution for applying the same correction to all the images in the session, even if some are in portrait and others in landscape.
This is possible because the dust is always in the same place.
Capture One Tutorial. Straighten perspectives.

The laws of perspective dictate that a building photographed from the ground appears to shrink towards the top. This distortion is completely natural,
and our brain intuitively corrects this distortion, giving us the impression of straight vertical lines.
However, when we look at a photograph, our brain does not automatically correct the perspective: the vertical lines then appear to be tilted
and converge towards the top.
This default can be corrected during post-production, or at least mitigated, as detailed in this tutorial.
Capture One Tutorial. Copying settings across several photos.

It is common to need to apply the same adjustments to several photos, such as white balance correction or
noise reduction. Capture One offers a number of quick and effective, if sometimes unconventional, solutions for carrying out these tasks.
However, implementing these methods can sometimes be a little confusing. This tutorial will guide you through these tasks.
Capture One Tutorial. Local settings : layers and masks.

Local retouching consists of applying one or more adjustments to just one part of the image.
Capture One, at least in its pro version, allows local adjustments.
The light version does not offer this facility; there must be some differences otherwise the full version would no longer sell.
Capture One uses layers for local adjustments, each associated with a mask.
The mask defines the area to which the adjustment is to be applied.
This tutorial explains how to create a new layer and how to draw the mask.
Tutorial Capture One. Renaming photos in batches.

Capture One offers a particularly effective tool for renaming photos,
with a number of automatic options, such as inserting the date, a serial number, EXIF or IPTC data, the GPS coordinates of the shot, etc.
Capture One Tutorial. Keyboard Shortcuts.

Shortcuts are combinations of keys to be pressed simultaneously, or the association of a keyboard key with mouse actions.
Using them speeds up your work, reducing the need to click on menus and icons to a minimum.
This page lists the main Capture One keyboard shortcuts: displaying or hiding items on the screen, sorting and editing photos,
quick access to tools, and more.
Tutorial Capture One. Tethered mode.

Capture One's tethered mode is reserved for studio work.
It's really practical, particularly for photos of objects that require a great deal of precision in framing and working with light, or when you want to allow
several people to see the photos as they're being taken (art director, model, etc.).
The connected mode supports 'Live View', camera settings and saving images directly to the computer.
Capture One Tutorial. Capture One user interface.
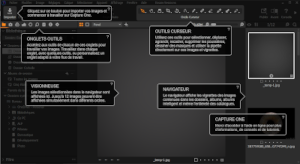
This tutorial clarifies the specific terms used by Capture One to designate the main elements present on the screen, such as the viewer or the
browser. Naturally, this workspace can be configured to meet your particular needs.
Being familiar with these terms will help you to understand the various tutorials available here or on the internet.
Capture One Tutorial. Creating / correcting vignetting.

The term "vignetting" refers to the darkening of the corners or edges of an image. This phenomenon can be perceived as an inconvenience when it results from
a poor quality lens or a lens hood that is too long. However, it is sometimes intentionally used to draw the reader's attention more towards the centre of the image,
in order to prolong observation and prevent the eye from turning away from the scene too quickly.
This tutorial explains how to remove unwanted vignetting, or on the contrary, how to add and dose vignetting.

If you liked this page, share it on your favorite network :