Capture One Tutorial.
Brightness adjust with Capture One.

During the process of dematrixing images, one of the most frequently requested adjustments is brightness correction. Even when the exposure has been correctly managed at the time of shooting, it is always necessary to balance the luminosity a little, or even to recover some slight overexposure or underexposure.
One of the trickiest cases is that of high-contrast images. Even the most powerful sensors are not capable of translating significant differences in luminosity. However, this situation is not uncommon. Here are just a few examples: a very clear sky and dark undergrowth, a lake reflecting light and the rocks on the banks, a group of people, some dressed in light and others in dark, with the particular case of the bride and groom.
Capture One has all the tools you need to get out of these tricky situations, allowing you to enhance underexposed areas while recovering detail from overexposed areas.
Note on exposure.
It can be difficult to adjust the exposure precisely at the time of shooting. The information displayed on the back of the camera (such as highlight warnings and histograms) is based on the JPEG produced by the camera, but you don't have to develop your photo with the same settings. For example, changing the white balance can turn an overexposed photo into a perfectly good one, proving that the RAW was not saturated, even if all the indicators on the back of the camera were flashing because of the white balance error. Ideally, light metering with a light meter would be the most accurate solution, but it's not practical, especially for reportage.
Nevertheless, it is essential to get as close as possible to the correct exposure when you take the shot. The post-processing process is not intended to rectify the exposure itself, but rather to harmonise the brightness levels of the different parts of the photo. Remember that increasing exposure in post-processing also increases noise, and although there are some very powerful software programs to remove this noise, it's still correcting a problem that might not have been created.
The example used in this tutorial.
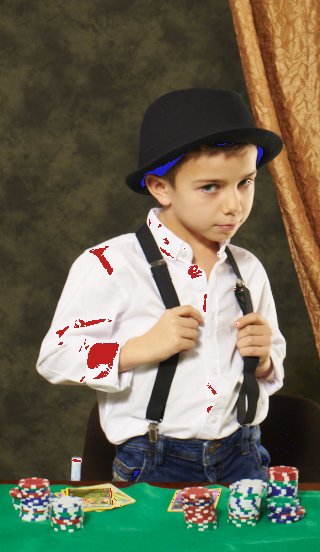
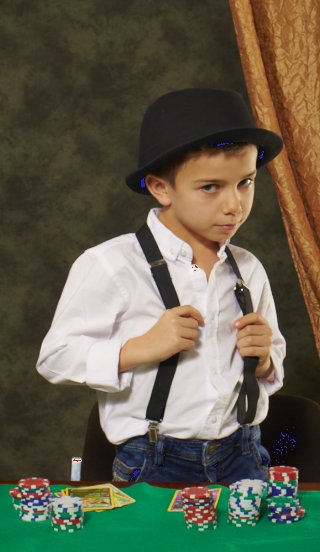
We're going to deal with the most complicated case: an image that has both very light areas (the boy's shirt) and dark areas (the hat, the chair, the braces). However, the exposure was correctly processed when the shot was taken. Capture One can't perform miracles such as recovering details in the highlights if these have not been recorded.
The method.


 , to show overexposed areas in red and underexposed areas in blue.
You can therefore quickly see if the image is correctly exposed: no red or blue.
In our example, we can see that the child's shirt is overexposed and that there are small underexposed areas under the hat.
, to show overexposed areas in red and underexposed areas in blue.
You can therefore quickly see if the image is correctly exposed: no red or blue.
In our example, we can see that the child's shirt is overexposed and that there are small underexposed areas under the hat.
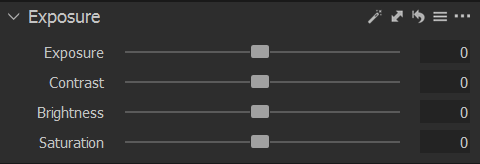
Click on the Exposure tab.


Find the exposure tool and move its Brightness slider to the left.
Note: the Exposure slider can also be used, but its effect is much more brutal.
This simple adjustment will allow you to recover an image that is too bright overall.
But in some cases, you may find that underexposed areas (in blue) appear elsewhere in the image.
In our example, this will be under the hat and on the chair.
This setting is therefore not the best in this case: return the brightness slider to zero.
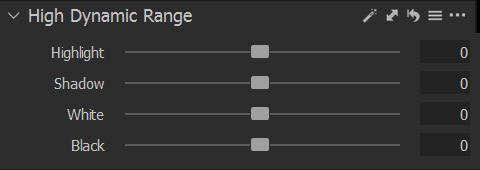
Now look for the "Hight Dynamic Range" tool. Please note that, despite its name, this tool is not used to create the well-known HDR effect.
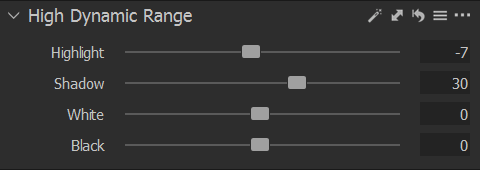
With its four sliders, this tool allows us to adjust the lowlights, highlights, blacks and whites separately.
Start by moving the high-light slider to the left, until the overexposed areas (on the shirt in our example) are turned off.
You can see that this does not create any new underexposed areas.
If necessary, move the "Shadow" slider to the right until any underexposed areas disappear.
Effect of brightness setting.

The original image shows overexposed areas on the shirt and small underexposed areas under the hat.


The global brightness setting reduces overexposure but worsens underexposure in already dark areas.
Effect of separate settings on highlights and shadows.
Let's start with the same image, which has both over-exposed and underexposed areas.

Highlight adjustment only affects very bright or overexposed areas.


Adjusting the shadows allows you to recover detail in underexposed areas.
To know also :
- A comparable result could have been obtained using local retouch layers, but much more slowly.
- The exposure alert thresholds can be adjusted in the preferences ("Modify" menu). The commonly used values are 250 for the overexposure threshold and 5 for the underexposure threshold.

If you liked this page, share it on your favorite network :