Capture One Tutorial.
Balance exposure.

Sometimes (especially in the studio) the lighting is not even throughout the photo. For example, the model's legs are less well lit than the face. This may be due to an incorrectly positioned light source or simply one that is too small.
This problem can also occur in natural light when the light source is limited (window) or when something shadows part of the photo (foliage, for example).
Capture One offers a quick and effective solution for balancing exposure between different parts of the photo, top and bottom or left and right.
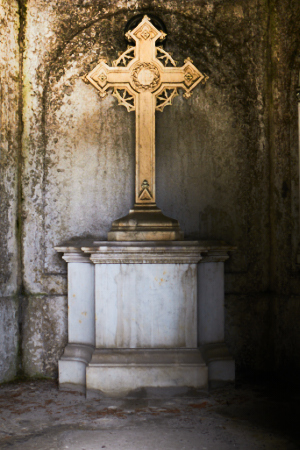
The case to be treated.

This cross is placed at the bottom of a niche with a fairly low opening: daylight never reaches the top of the cross.
To photograph it, you therefore need to either provide artificial light (flash or lamp), or accept an imbalance of light between the top and bottom of the photo. This second solution is much simpler, because adding lighting that respects the atmosphere of the location would not be easy.
Then, when developing, you need to balance the exposure so that the top of the cross is correctly exposed. The correction can be adjusted if you wish to preserve the impression of half-light.
The solution we describe here uses Capture One's local settings, and more specifically local settings with a gradient mask.
The mehod.
If you want to put this tutorial into practice quickly, we suggest you download the example image. You can then apply the method to your own photos.
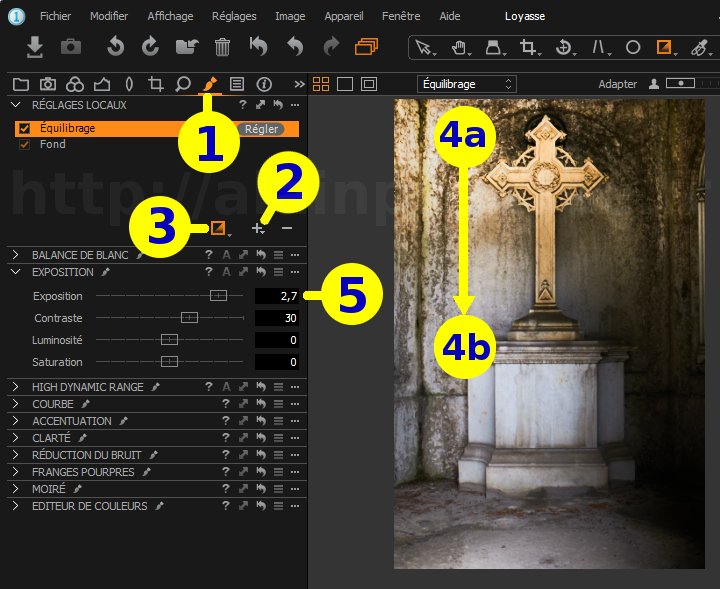

The Layers tool can be found on just about every tool tab, but you're sure to find it on the tab dedicated to local settings:


 .
.This will create a new layer which you can name 'Balancing'. Naming the layer is not compulsory, but it is useful when there are many layers.
 .
.
Press the mouse button on the top of photo 4a and drag downwards to approximately position 4b. As the bottom of the photo is correctly exposed, the mask does not need to cover the whole image.
You can follow the effect of your correction on the image in real time. It's not necessarily necessary to cancel the exposure difference completely: you can keep the top of the image a little darker to stay close to reality.
The résult.
Original photography,
before treatment with capture One
Photography with retouched exposure
with Capture One
Also to know...
- Activate the exposure warning
 to immediately spot any areas that may be overexposed (displayed in red) or
underexposed (displayed in blue).
to immediately spot any areas that may be overexposed (displayed in red) or
underexposed (displayed in blue).

If you liked this page, share it on your favorite network :