Capture One Tutorial.
Local settings : layers and masks.

One of the most interesting features of Capture One is that it allows local retouching, i.e. adjusting only part of the image. With each successive version, the number of adjustments that can be made locally has increased considerably.
Note, however, that local retouching is only possible on the 'Pro' version. The "Light" version does not have this feature.
General method for local retouching.
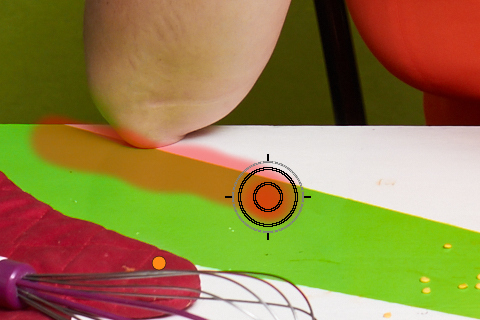
We're going to work on the following example: in this photo, the green stripe on the table looks a little too pastel compared to the rest of the image. We therefore want to increase the saturation in the area of the image corresponding to the green stripe, but without changing anything for the rest of the image.
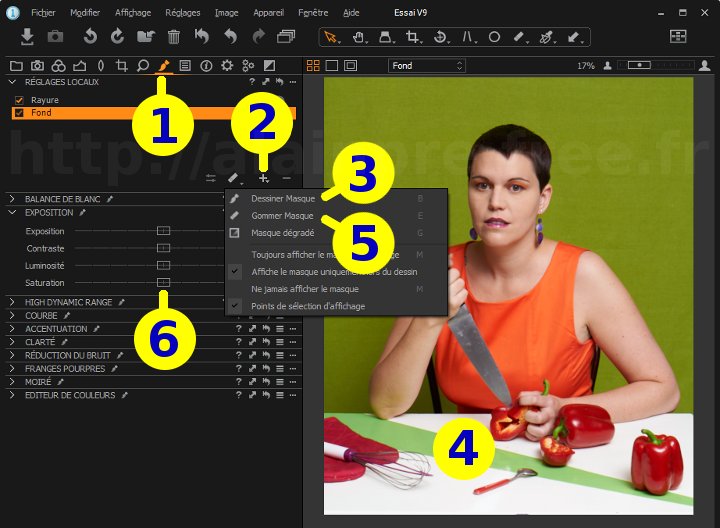

Click on Local tools tab.


 button. You can then name this new layer "Stripe" if you wish.
 button.
This button can be found in several places: on the layers panel, or on the "Cursor tools" part of the toolbar. In the latter case, you may need to hold the click down until the menu opens and gives you a choice of tools.
The mask appears translucent red (but the mask colour can be customised). If you overflow onto the white tablecloth, it's not a problem, as the saturation setting will have no effect on the white colour. But be careful not to touch the background of the photo, which is also green, or the model's elbow, or the peppers.
 button to erase the mask.
If you are using the cursor tools on the toolbar, you may need to hold the click down for a second or two to bring up the menu.
button to erase the mask.
If you are using the cursor tools on the toolbar, you may need to hold the click down for a second or two to bring up the menu.
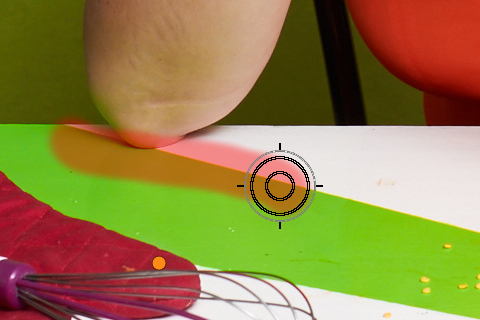
The effect is immediately visible on the part of the image corresponding to the mask.
Remember these two time-saving keyboard shortcuts:
- E (Erease) to activate the mask eraser tool.
- B (Brush) to activate the mask drawing tool.
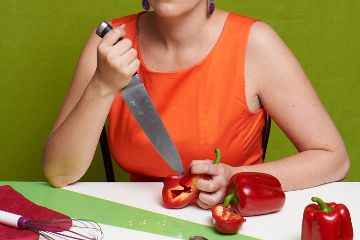
Original picture.

The image after adjusting the saturation of the green stripe
Adjust mask design tool parameters.
he tools used to draw the mask can be adjusted in a number of ways: in size (large for covering large areas or small for fine-tuning details), but also in hardness, to obtain sharper or softer mask contours, etc.
To access these settings, the easiest way is to right-click on the image after selecting the drawing tool you want, but you can also click on the
 button.
This will bring up a window containing the settings for the selected tool. Adjust these settings as required.
There's no need to confirm: the changes take effect immediately and the window will disappear as soon as you move the mouse over the image.
button.
This will bring up a window containing the settings for the selected tool. Adjust these settings as required.
There's no need to confirm: the changes take effect immediately and the window will disappear as soon as you move the mouse over the image.
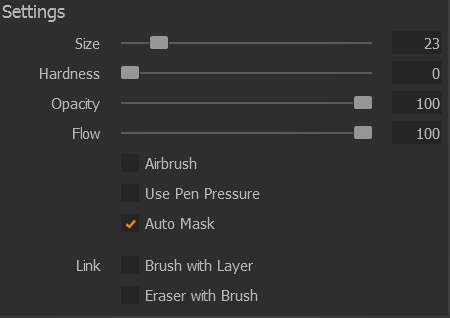
- Size : you will see the size of the tool change as you move this slider.
- Hardness : at 0% the transitions between the selected parts and the others will be gradient. At 100% the hardness is at its maximum: the edges of the line are abrupt and without transition.
- Opacity : is used to control the strength of the settings. An opacity of 100% gives the maximum strength to the adjustments applied to this layer. This parameter is particularly interesting because it allows you to go back over an area of the image several times to gradually increase the impact of an adjustment.
- Flow : to be used in conjunction with the "Airbrush" option. By choosing a low flow rate, you can match the density of the mask to the speed at which the mouse moves.
- Airbrush : The slower you move the mouse, the greater the effect of the brush (adjustable using the "Flow" slider). Basically, the airbrush acts like a spray can.
- Use pen pressure : this option is useful if you are working with a tablet instead of a mouse.
- Auto mask : With this option, the mask outline is automatically adjusted on the image. We'll come back to this later.
- Link brush with layer : the settings chosen for this drawing tool will be applied to this layer only.
- Link eraser with brush : as its name suggests, this option lets you apply the same settings to the brush and the eraser.
Use the keyboard to save time.
Capture One has a number of keyboard shortcuts to speed up work with layers, particularly when drawing the mask.
There are significant differences in this respect between the Windows and Macintosh versions.
- M : whether or not to display the layer mask. When drawing, it is often useful to see the mask over the image (in translucent red) but to adjust the settings and judge the effect, it is preferable to hide the mask.
- B (Brush) : activates the brush.
E (Erease) : activates the eraser.
L (Gradient) : activates the drawing of a linear gradient mask.
T (Gradient) : activates the drawing of a radial gradient mask. Right clickon the image: displays the settings for the current tool (brush or eraser).Mouse wheel: zoom the image in or out.
ALTMouse wheel: scrolls the image vertically (if it is not visible in full).
ALT CTRLMouse wheel: scrolls the image horizontaly (if it is not visible in full).- ] (right bracket) : reduces the size of the current tool (brush or eraser).
SHIFT ] : reduces the hardness of the current tool (brush or eraser).
Logically, the [ key should have the opposite effect, but it doesn't work, at least not on our version.
Note: if you're using a graphics tablet, Capture One supports pen pressure, so you can change most of these settings instinctively.
A full list of keyboard shortcuts can be viewed with the Modify / Edit keyboard shortcuts menu.
The Keyboard shortcuts tutorial can also be viewed on this site.
Meaning of the different cursor shapes.
Observe the shape of the brush or eraser as you draw the mask. There are many small details that are useful to know.
 |
Brush cursor A small + in the center indicates the brush ("Draw mask" tool). |
 |
Curseur de la gomme A small - in the center indicates the eraser ("Eraser mask" tool). |
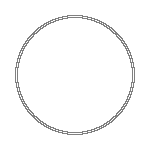 |
Brush cursor with hardness equal to 0. The strength of the tool decreases from the centre outwards. The large circle indicates where the tool no longer has any effect. |
 |
Brush cursor in automatic mode. The large circle can (must) extend beyond the area you wish to cover. The small circle, on the other hand, must never go outside this area. |
 |
Brush cursor in automatic mode with hardness set to 0. You end up with three circles. Be careful not to get lost. |
The auto mask drawing.
The "Auto Mask" option lets you draw masks more quickly: when you release the mouse button, the mask automatically adjusts to the contours of the image.
Capture One's automatic mask adjustment isn't perfect: it's often necessary to redraw in certain places.
Copy and correction layers.
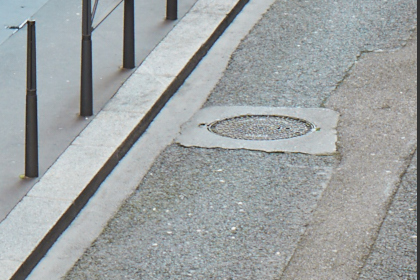
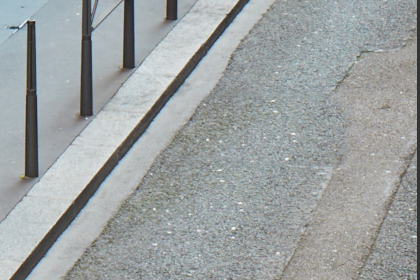
These two types of layer (also known as repair layers) allow you to copy one part of the image onto another. This is very useful for removing unwanted elements from the background. Repair layers will be the subject of a separate tutorial.
In the photo below, for example, we used a copy layer to make the manhole cover disappear.
Other things to know :
The mask colour defaults to red and semi-transparent, but you can change this via the
Edit/Preferencesmenu. This can be useful on a photo that itself contains a lot of red.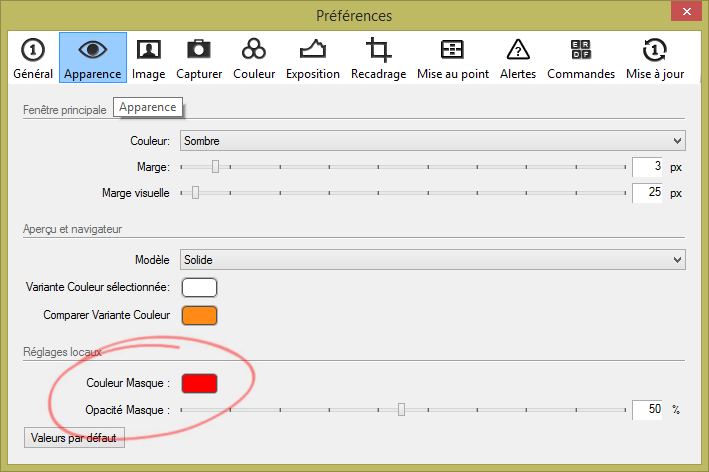
- For complex processes requiring several layers, it may be necessary to move quickly from one layer to another. To do this, use
the list of layers :
- M key displays or hide the mask. By default, the mask is only visible during plotting, but it is sometimes necessary to display it for control purposes.

If you liked this page, share it on your favorite network :