White balance.

White balance (WB) is an important adjustment which, when done correctly, produces photos with natural colours. Conversely, the wrong setting will result in reddish, bluish or otherwise colour-distorted photos. Most of the time, this distortion is due to the light source. An incandescent bulb produces an orange light. Conversely, in the shade of a building or foliage, the light is very bluish. The light we consider neutral is sunlight in the middle of the day.
Our eyes adapt so well that we don't notice these colour differences, but they will be very visible in a photo.
Adjusting the white balance when shooting.
In automatic mode, cameras are able to compensate for these dominant colours. However, they can be 'fooled' by the presence of a strongly coloured wall near the subject, for example. In this case, you will either have to make the adjustment yourself when you take the shot, or correct the problem during post-processing.
All cameras offer a white balance setting, with a number of predefined values (see below) and a finer setting to indicate the desired colour temperature in degrees Kelvin.


Sunlight at midday has a colour temperature of between
5500°K and 6500°K (degrees Kelvin).

The color temperature of a cloudy sky can reach
8000°K.

This setting corresponds to a colour temperature of
6500°K to 8000°K, close to that of a cloudy sky.

The colour temperature of an incandescent bulb is around
2700°K.

On most cameras, this setting corresponds to a colour temperature between
4000°K and 5000°K.

Flashes generally have a colour temperature close to that of daylight : around
5000°K.
Adjusting white balance at post-processing.
Warning! Correcting white balance after the fact (in post-processing) is only effective if you are shooting in RAW format.
With this precaution, the white balance can easily be modified on the computer, without altering the quality of the image. This is because white balance is a setting that does not modify the data in the RAW file, even though the chosen setting is recorded in the file's metadata. You can therefore easily change the setting you choose when you take the shot, or correct what the camera has done in automatic mode.
Using a grey card.
The technique we describe here allows you to obtain a very precise white balance. Note that it is not always necessary to be so precise, but you can do more if you want to.
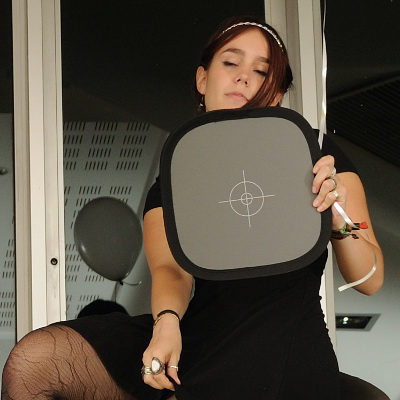
You'll need a grey card. This is simply a piece of cardboard or fabric in a neutral grey, with no dominant colour. It is usually 18% grey. The grey part is often supplemented by a white zone and a black zone. This accessory is not expensive and can be bought in any photo shop or on the internet.

If you are working in a studio, the paper, grey or black background can be used as a reference instead of the grey card.
You need to photograph your grey card. This photo will be your calibration photo; it will be useful during post-processing. The card should be placed in the same place as the subject and should be lit in the same way as the subject. It should be square and perpendicular to the axis of the camera.
Of course, if you change location, you need to take another calibration photo. Similarly, if you are concerned about colour variations during the session, you should regularly repeat the calibration photos. Outdoors, this may be the case when the sky is partly cloudy: there is a big difference in colour between the visible sun and a sky hidden by clouds. In the studio, the variations may be due to the lighting equipment heating up.
Take care of your grey card : if it gets stained, it will no longer be usable. However, some are washable.
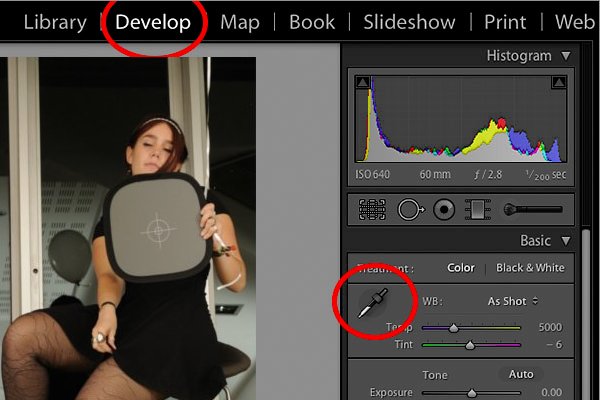
Correcting white balance with Lightroom.
- Open your calibration photo (the one with the grey card).
- In the "Development" module, look for the "White balance" section.
- Select the dropper and click on the grey card (in your photo).
- Copy or write down the "Temperature" and "Hue" settings so that they can be used for all photos taken under the same conditions.
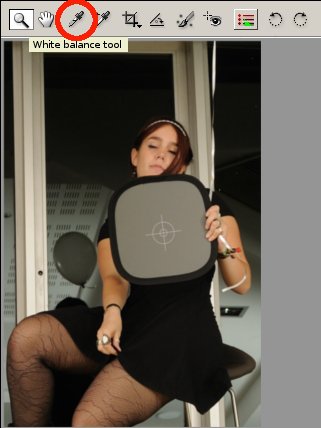
Correcting white balance with Camera Raw.
- Open your calibration photo (the one with the grey card).
- Select the tool "White balance".
- Click on the grey card (in the image).
- Copy or write down the "Temperature" and "Hue" settings so that they can be used for all photos taken under the same conditions.
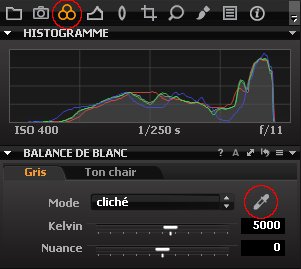
Correcting white balance with Capture One.
- Display your calibration photo (the one with the grey card).
- Click on the pipette.
- Click on the grey card (in the image).
- Copy or write down the "Temperature" and "Hue" settings so that they can be used for all photos taken under the same conditions.
Conclusion.
This method of white correction using a grey scale is fast and accurate. Its only drawback is that it requires a calibration photo, so don't forget to take one when you shoot.

If you liked this page, share it on your favorite network :