Capture One Tutorial.
Quick editing.

The first step in post-processing is to select the photos: i.e. determining which photos will be kept and processed and which can be deleted for example because they have a major technical defect. This operation is often referred to as "editing".
Editing is a fairly tedious job. Fortunately, with a few keyboard shortcuts and commands, Capture One lets you get the job done fairly quickly.
When the number of photos is large and they are relatively similar, which is particularly the case for studio sessions, we recommend the star rating system (see below).
Table of contents.
- Selecting and deleting photos.
- Recovering photos deleted by mistake.
- Physically deleting photos.
- Using star ratings.
- Using color rating.
- Also worth knowing.
Selecting and deleting photos.
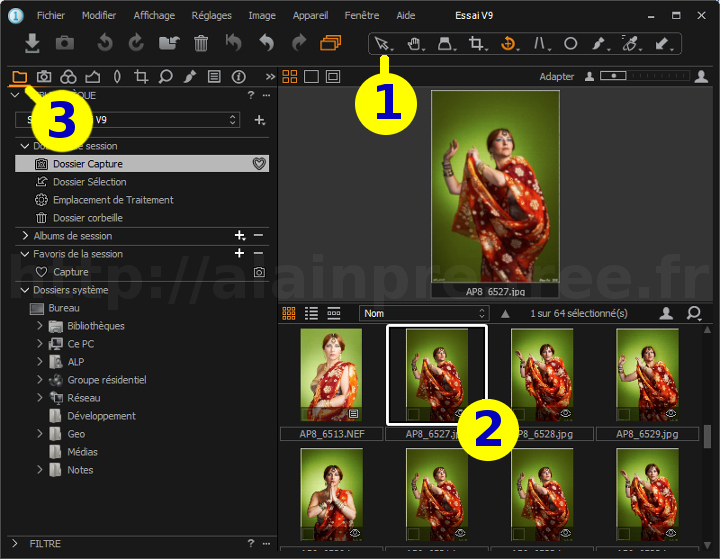

 button on the toolbar.
In fact, the tool you choose is of little importance; you should simply avoid tools that can modify images with a single click, such as
 for example.
- To accept an image:
In other words, to mark it as interesting, with a view to processing it later.
Click on the image and type CTRL+J.
You can also right-click on the image and choose "Move to selection folder". - To delete an image:
In other words, move it to the "Trash" folder. Click on the image and type DEL.
You can also right-click on the image and choose "Delete".
You can also click on the "Library" tab to see what's going on:
- The selected images have been moved to the "Selection" folder..
- Deleted images have been moved to the "Trash" folder.


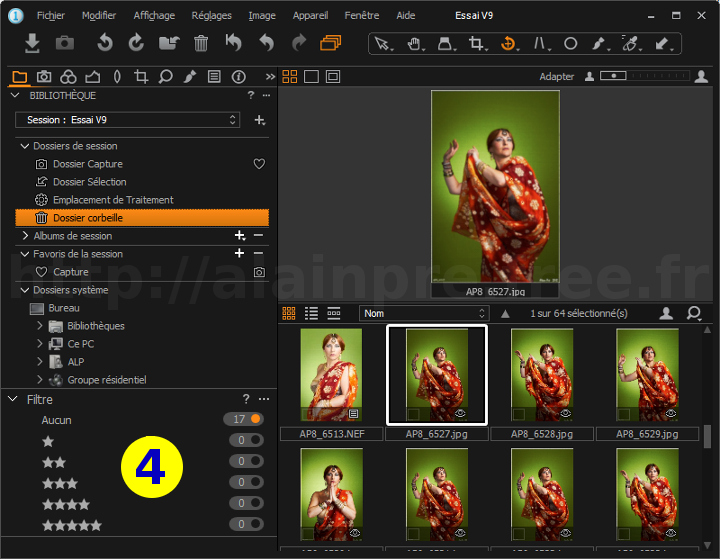
Recover photos deleted by mistake.


Click on "Library" tab.
Deleted photos appear in browser.
Physically deleting photos.
We have seen that the Capture One deletion tool does not really delete the photos: it just moves them to the "Trash" folder. This has the advantage of allowing the recovery of an image erased by mistake but it may be necessary in the end to actually delete photos.
The method depends on your working style (catalog or session) :
-
If you work in a session:
For images that are already in the "Trash" folder, simply select them in the browser and press the "Delete" key.
For images that are in other folders, you can use the CTRL+DEL key combination (delete without go through the "Trash" folder.
-
If you are working in a catalog with photos entered in the catalog:
It's the same thing: delete the images already in the "Trash" folder, or press the CTRL+DELETE keys. -
If you are working in a catalog and left photos in their original location:
The decision to physically delete the photo is made when you press the DELETE key. The following message is displayed:
By clicking on the "Delete From Disk" button, you erase the image from the catalog AND from the disk.
By clicking on the "Remove From Catalog" button, you delete the image only from the catalog but it remains present on the disk.
Using stars rating.
If you need to make a more nuanced selection, you can use Capture One's scoring system: Each photo can be assigned a rating of 0 to 5 stars. To assign grades, select the photo(s) in the browser and press a key from 0 to 5 on the number pad.

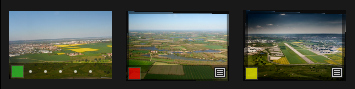
The ratings assigned to the photos are visible in
the browser. Here the first photo was rated 2 stars,
the second did not receive a rating (or a 0 rating)
and the third received a 5 stars rating.

When the thumbnail display is too small,
Capture One uses a different layout for notes:
a single star preceded by the number of stars awarded.
You can then use 4 filters or create smart albums to only display photos with a certain rating.
This method allows you not to delete photos, but simply to highlight those that seem the best. It's much easier psychologically.
- On a quick scan of the images, give a score of 1 to those that seem most interesting.
- Then click on the "1 star" filter: only photos with this rating will be displayed.
- Go through the images again (there are already fewer of them) and give a score of 2 to those that look better by comparison.
- Click on the "2 stars" filter to further restrict the number of photos displayed.
- Continue in this way, awarding higher and higher scores until a satisfactory number of photos have been selected.
Using colour tags.
Colour tags are used to quickly classify photos. We can agree, for example, that the colour red identifies mediocre photos, yellow identifies photos that are OK but of no particular interest, and green for the best photos. As with star ratings, it will be possible in the 'Library' tab to create intelligent albums or use filters to display only photos marked with a certain colour.
The colour tags can be set by right-clicking on the photo or using the "Settings" menu. Some colours are also associated with a key on the numeric keypad (note that the same keys on the alphabetic keyboard do not work):
- + (plus key) for the green colour.
- - (minus key) for the red colour.
- * (multiply key) for yellow.
The colour tags are clearly visible in the browser.
Other things to know:
- All these operations can be done individually, photo by photo, but also for a whole group of photos if the button
 is enabled.
The SHIFT and CTRL keys held down during the click allow you to select several images in the browser.
is enabled.
The SHIFT and CTRL keys held down during the click allow you to select several images in the browser.
Also note CTRL+A to select all images in the browser. - The
 button on the toolbar allows you to spot focus errors very quickly.
It can be very useful during the photo selection/deletion phase, especially if you are working with a shallow depth of field.
button on the toolbar allows you to spot focus errors very quickly.
It can be very useful during the photo selection/deletion phase, especially if you are working with a shallow depth of field.
- If you have trouble navigating through the folders and subfolders created by Capture One, you may know the physical location of a photo with the "Show in Explorer" command. To display this command right click on the image in the browser.

If you liked this page, share it on your favorite network :