Capture One Tutorial.
Dramatising the sky.

Often, a sky appears too milky and uniform, with the result that clouds are indistinct and barely visible. In such cases, simply reducing the brightness of the sky is often enough to bring about a marked improvement. This usually results in a more balanced rendering and makes cloud details more visible. However, the difficulty lies in making this correction without altering the exposure of the rest of the photograph.
The method of manually creating a mask over the sky can be a laborious and time-consuming task. It requires a great deal of attention to detail to ensure that the mask encompasses precisely the area of sky without encroaching on other parts of the image. If the composition includes elements such as tree leaves touching the sky, the process becomes even more complex and difficult to achieve with precision.
An alternative to creating masks manually is to use advanced retouching software. Some of these programs offer intelligent selection or automated masking tools, which can make the process of correcting the sky much easier without altering the rest of the photo.
This tutorial describes a solution that uses Capture One's colour editor. It takes just ten seconds or so and doesn't require any meticulous cropping.
Working image.

This photo shows part of the sculptu Albert Louis Chanut, which can be seen on the Place du Bicentenaire in Saint-Étienne (France).
For this image, the aim is to create a darker, more menacing atmosphere, with a heavy sky and a stormy mood. Although the underexposure option may seem adequate to achieve this desired effect, the real difficulty lies in the ability to make these changes exclusively to the sky, without altering the other elements of the photo.
There is, of course, the solution of creating a local adjustment layer, but the mask will have to be carefully drawn to cover the sky without touching the sculpture. This will take quite a long time and may even prove difficult because of the tortured shape of the sculpture, although Capture One has a tool to make it easier to follow the contours while drawing the mask (Auto Mask).
For this tutorial, we're going to focus on a colour-based selection approach. However, this photo presents an additional complexity to take into account: the sky is reflected on the surface of the sculpture, which means that the selection will have to be carried out with great precision.
The method.
You can use this tutorial on your own RAW files or download the image used in our example:
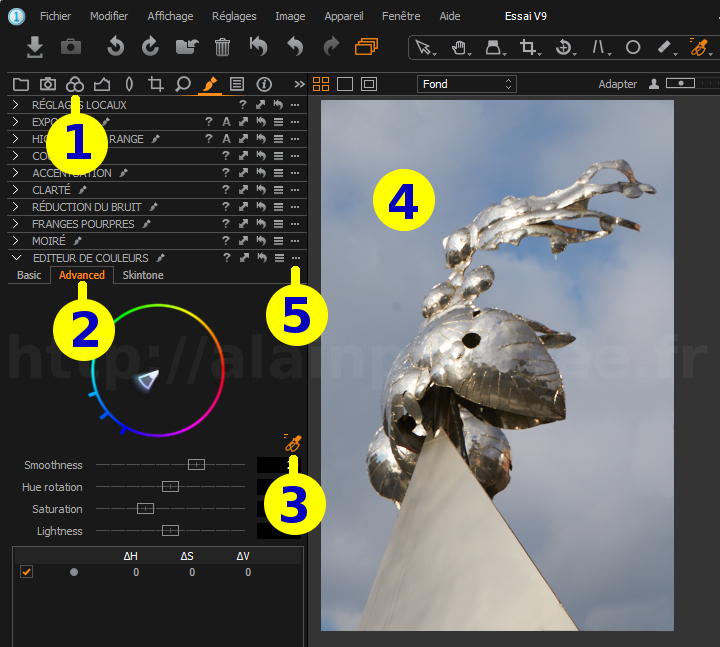

Click on the Color tool tab


Find the Colour Editor tool and click on its Advanced tab.
Compared with the Basic tab, the Advanced tab allows more precise selection of the colour to be modified.
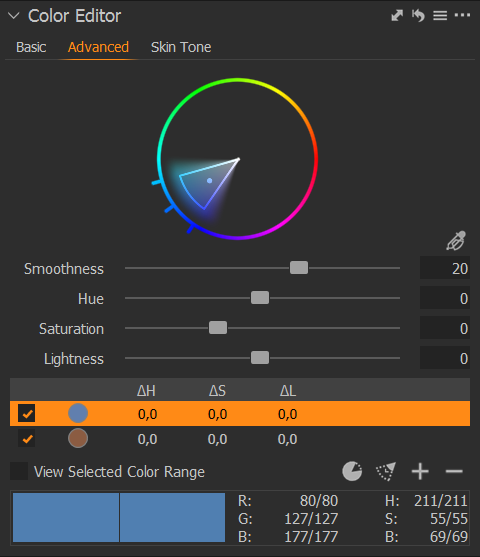
 . This picker lets you select a colour by clicking in the image.
Click on the sky in the image. The portion corresponding to the chosen colour is displayed in the colour wheel of the colour editor. It may take a few tries to decide whether it is better to click on a blue part of the sky or on the white of a cloud.
By ticking the Show selected colour range box, you can view your colour selection:
unselected colours are displayed in shades of grey.
Open tool menu  and click on
 Create masked layer from selection.

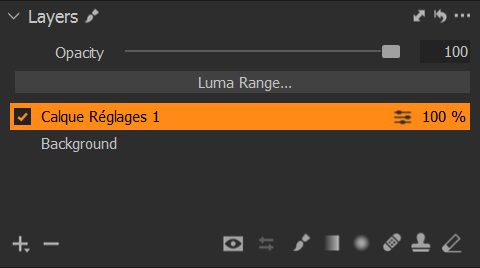
Now click on one of the tool tabs Local, Exposure, Color, etc.
All these tabs display the Layers tool.
You can see that a layer has been created in the list of layers.
 tool to erase the mask in these areas.
That's all there is to it!
As you can see, it's very quick.
The colour editor is a really practical tool and the fact that you can create a layer mask
from the colour selection (possible since Capture One version 9) makes things even simpler.
The result.
Original photo, before sky treatment
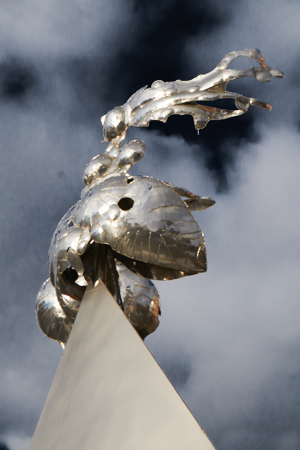
Photo after sky treatment

If you liked this page, share it on your favorite network :