Capture One Tutorial.
Capture One user interface.
Capture One's workspace is designed to make the most common tasks performed during therawtisation process quick and easy: exposure correction, white balance adjustment, etc. This tutorial explains the terms used by Capture One: viewer, browser, etc. and describes the main commands accessible from the toolbar. Browsing this page may also help you discover some Capture One features that you don't know about.
Of course, this space can be configured to suit your particular needs: see our tutorial on customising Capture One.
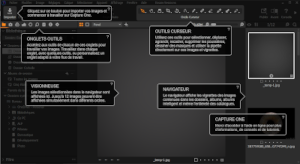
The Capture One workspace looks like this:


This is the main window, taking up most of the screen. The photo currently being processed is displayed here. You can zoom in and out at will using the mouse wheel.
It shows all the photos from the session or the catalogue. Choose the one you want to work on here. There's no need to open or save the images: any adjustments you make are immediately saved.
The adjustment tools are grouped here under the various tabs: colour, exposure, etc.
It provides quick access to the most frequently used tools. The central part contains tools that can be used with the mouse (drawing a mask, cropping, etc.). The toolbar can be customised.
The toolbar.


 Cursor Tools


The toolbar is located at the top of the screen, just below the menus. It should not be confused with the toolbox, which is located on the left of the screen by default.
The toolbar provides one-click access to most common commands. The central part is occupied by the Cursor Tools,
which change the role of the mouse cursor. For example, the cursor tool  gives the mouse the ability to draw a mask.
Pictograms displayed by default on the toolbar.
Here are the meanings of the main pictograms on the toolbar by default:
 Cursor Tools
The Import button adds new photos to the current session or to the catalog.
 Cursor Tools
The Export variants button generates one or more files with the selected variants. The parameters and format of this file can be
chosen from a number of possibilities (JPG, TIF, etc.).
 Cursor Tools
This button is only active when Capture One is used in connected mode, i.e. with a camera connected to the computer. This button then triggers the shot.
 Cursor Tools
Initializes the settings of all the selected variants.
 Cursor Tools
Cancels the last modification made. This mainly concerns actions carried out on one of the settings, but also a few other actions such as applying a note or deleting a photo. such as applying a rate or deleting a photo.
 Cursor Tools
Repeats the action that has just been undone. This command is inactive if another action has been performed since the last undo.
 Cursor Tools
Applies automatic settings to all selected variants.
Cursor Tools
Makes it easier to see the effect of adjustments by displaying the before and after images side-by-side.
Cursor Tools
Displays or hides a grid over the photo displayed in the viewer. The colour and type of grid can be chosen using the Grid tool in
the Lens tab.
Cursor Tools
Displays or hides exposure alerts. When they are displayed, Capture One identifies overexposed areas in red on the photo and underexposed areas in blue.
 Cursor Tools
Provides access to tutorials and help pages on using Capture One.
Cursor Tools
Allows commands to be applied to all selected variants. By default, commands apply only to the main variant.
Cursor Tools
Copies the settings of the main variant to the clipboard.
Cursor Tools
Applies the settings currently on the clipboard to all the selected variants.
Commands that can be added to the toolbar.
You can customise the toolbar by right-clicking on it. All the available commands are displayed, and additional pictograms can be added by dragging them onto the toolbar.

Whether or not to display annotations. Annotations are inscriptions or freehand drawings that can be added to the photo, for example, to explain to a collaborator a job to be done.

Displays the battery charge status of the camera. This command is only available if Capture One is operating in connected mode (camera connected to the computer).

Starts processing the selected variants, according to the parameters defined in the current recipe.
Recipes can be created or modified in the Output tools tab.

Copy the settings of the main variant to all the selected variants.

This command is only useful in connected mode. When composition mode is activated, Capture One displays the photo just taken, but does not save it to disk. This means you can take a large number of test photos without taking up disk space. Highly visible pictograms are displayed on the screen for as long as the composition mode is active, so that you don't forget to deactivate this mode when the tests are finished.

Provides access to customise the toolbar.

Moves the selected variants to the Trash folder. Variants stored in the Trash folder are normally intended to be deleted.

Shows or hides the focus mask. This mask, generally green in colour, indicates the zones on which the focus is optimal.
Shows or hides guides. These are horizontal or vertical lines that can be superimposed on the photo, and can be used as a guide to align elements
or precisely adjust the horizontality or verticality of the image.
A command in the View menu can be used to add additional horizontal or vertical guides.

Moves the selected variants into the selection folder. Photos stored in this folder are usually considered good to be processed.
Provides access to a library of Capture One tutorials and webinars.

Shows or hides the superimposed image. Superimposing an image over photos is useful when you need to reserve space for a title, a logo, or anything else that will be added later, when printing.

Provides access to capture One customisation: the preferences window, also accessible by the Edit menu.

Starts a printout of the selected variants.
Starts processing the selected variants, according to the parameters of the active recipe.

This command allows you to publish images in online galleries or on social networks. The command requires a plugin that corresponds to the website
on which the publication is envisaged. Plugins can be installed: see the Modify / Preferences menu.
")
")
Turn the selected variants clockwise for the first pictogram, or anticlockwise for the second.


Selects the previous or next variant, depending on the order in which it is displayed in the navigator.

Starts a slideshow with the selected variations. You can change some of the slideshow parameters (transition mode, duration of each image, etc.).

Displays a list of existing styles and lets you apply one to all the selected variants.

Displays advice on using Capture One. Depending on the version, this command may be limited to displaying bubbles to identify different parts of the screen.

Capture One calls the layout of the various windows on the screen, and the way they are shown or hidden, "Workspace". Several screen configurations can be saved and/or recalled using this command.
Toolbox tabs.


Each tab contains adjustment tools. You can change the order of the tabs with the mouse by holding down the ALT key. Right-click to add or remove a tab. You can also add or remove tools from each tab. The capture One workspace is therefore fully configurable. A standard configuration is described below.
Here are the most frequently displayed tabs in Capture One. As the tabs are customisable, the order of the tabs may be different on your machine, or even some tabs may not be present. Please refer to the tutorial on customising if you need help.

The 'Library' tab contains tools for organising photos: keyword management, photo search, disk directory browsing, etc.

The 'Capture' tab is useful when working with the camera connected to the computer (tethered mode): it includes a viewer showing what is seen in the camera's viewfinder and the tools for controlling the camera (shutter release, main settings).

The 'Color' tab: everything you need to adjust colours: white balance, of course but also much more sophisticated tools like the colour editor. You can also convert to black and white in this tab.

The 'Exposure' tab shows the most common settings: exposure, contrast, etc. The histogram is generally displayed in this tab.

The 'Lens' tab: settings to correct lens faults. Most modern lenses are recognised by Capture One, so you won't need to do much in this tab, except perhaps for adjusting vignetting, which is also in this tab.

The 'Details' tab: tools for sharpening, reducing noise or adding grain.

The 'Metadata' tab is particularly useful for consulting the EXIF information for the photo.

The 'Output' tab will be the one you use at the end of your development work: it allows you to define the output format (jpg, tiff, etc) and many other parameters: calorimetric space, dimensions, directory, etc.
Other tabs exist, but are not necessarily displayed by default. You can make them appear by right-clicking on the tabs already displayed. See the Capture One customisation tutorial for more details.

The 'Composition' tab: this essentially contains the cropping tool, the rotation tool and the high-performance tools for straightening verticals and managing the perspective effect (particularly useful for architectural photos).

The 'Local' tab. Its main tool is the one that manages layers. This tab is less useful in the latest versions because the main local processing tools are found in the 'Exposure' and 'Colour' tabs.

The 'Settings' tab displays styles and presets.

The 'Batch' tab displays the list of pending treatments and the history of treatments already carried out.

A tab that brings together the most useful tools when working with a black and white photo: the conversion tool, of course, but also exposure, curves, vignetting, grain, etc.

A summary tab, with only the most commonly used tools: exposure, white balance, cropping, rotation, and a few others.

You can add as many tabs as you like, and fill them with any tools you like. These tabs will be displayed with a number or an icon.
The tools.
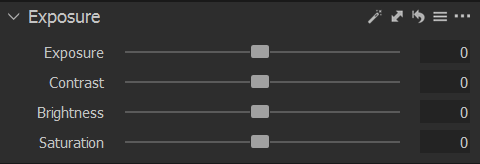
Most of the tools actually have several settings. The 'Exposure' tool, for example, gives access to the exposure setting itself, but also to the adjustment of contrast, brightness and saturation.
The little arrow to the left of the tool name lets you fold or unfold the tool. This is very useful, given the number of tools available in Capture One: the screen is often a little crowded. Below, the 'White Balance' tool is unfolded and we see four tools folded underneath: 'Colour Editor', 'Colour Balance', "Black & White" et "Normalize".
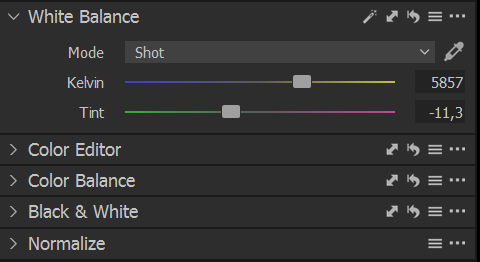
To the right of the tool title are a number of accessories, each with a very specific role:
Automatic: determines the best settings based on an analysis of the photo. This button is only available with certain tools, and its effectiveness varies widely. Over the years, the pictogram of this button has evolved: the A or the magic wand.
Copy settings (to apply them to other images).
Reset button: returns all tool settings to their initial values.
By holding down the ALT key, tools are only temporarily reset: settings are restored when the mouse is released.
Presets: displays a list of predefined settings suggested by Capture One.
Additional menu: gives access to more or fewer functions depending on the tool. But the menu always includes at least the command to remove the tool from the tab.

If you liked this page, share it on your favorite network :