Measuring light.

Modern cameras have automatic systems that measure the light and adjust the settings accordingly.
However, there's no reason why you shouldn't be able to measure light manually using a light meter or flash meter. This is essential for studio work and can be very useful in difficult situations.
How is light measured ?
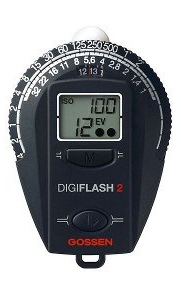
Light is measured using a light meter (more called a 'lux meter') or a flash meter. To measure ambient light, any type of light source will do, but to measure the light from a flash you need a flash meter, i.e. a meter capable of reacting very quickly and synchronising the measurement with the flash.
Many manufacturers offer this equipment, at widely varying prices. Here are some of the best-known models :


Measurement of incident or reflected light.
In photography, there are two ways of measuring light :
- Measure the incident light, i.e. the light emitted by a source that illuminates the subject. Also known as illuminance, this value is expressed in lux. (see lux on Wikipedia).
- Measure the reflected light, i.e. the light reflected by the subject back to the camera. This is also known as luminance, expressed in candelas per square metre. (see cd/m² on Wikipedia).
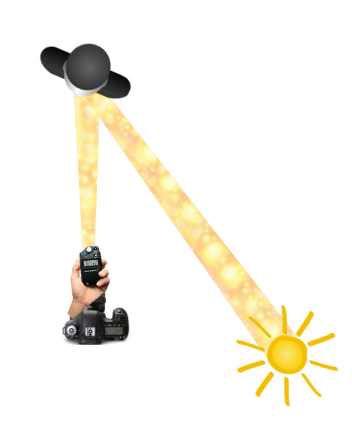
Measurement of incident light or illuminance.

The light meter is placed as close as possible to the subject and pointed towards the source (the lamp, the flash, the sun, etc.). This technique is precise. It is generally used in the studio. But on location it is not always easy to use.
Measurement of reflected light or luminance.
The light meter is placed on the camera and aimed at the subject. The light reflected by the subject is measured. This method is preferable for outdoor use when the light does not come from a specific source, such as on an overcast day.
Camera cells naturally measure reflected light.
Most light meters allow both types of measurement. The choice will therefore depend on other criteria. But here are a few classic examples.
| Measurement of incident light | Measurement of reflected light | |
|---|---|---|
|
No light meter available. |
X | |
|
The subject is not accessible (see examples below). |
X | |
|
The light source is not precise. |
X | |
|
Studio work. |
X |

In the case of landscapes, reflected light is often the only measurement possible.

In this example, it's hard to see the photographer approaching the subject with his light meter.

When the subject is moving, it's not easy to measure incident light either.
How to use a light meter or flashmeter ?
Several measurement methods are possible. Below we describe the speed-priority method, which is the one used in the studio. To measure with aperture priority, simply swap aperture and exposure time in the explanations below.
- Choose a measurement mode (see below).
- Choose a sensitivity (iso) and indicate it on the flashmeter (example: ISO 200).
- Choose an exposure time and set the flashmeter accordingly (example: 1/125th of a second).
- Choose to work with dome extended or dome retracted (see below).
- Take the measurement and read the aperture value calculated by the light meter.
- Select manual exposure mode on the camera.
- Transfer the chosen sensitivity, exposure time and aperture calculated by the flash meter, to the camera..
Measurement modes.
Several measurement modes are available. The selection mode and pictograms may vary from one brand and model to another, but they are all more or less the same. Here are the pictograms used by Sekonic:

Continuous or natural light, aperture priority.
The aperture and sensitivity are chosen by the photographer, and the light meter indicates the exposure time as a function of these parameters and the light measured.

Continuous or natural light, exposure time priority
The exposure time and sensitivity are chosen by the photographer, and the light meter indicates the aperture as a function of these parameters and the light measured.

Continuous or natural light, TF mode.
The exposure time and the apertyure are chosen by the photographer, and the light meter indicates the sensitivity as a function of these parameters and the light measured.
Using a flash.
The exposure time and sensitivity are chosen by the photographer, and the light meter indicates the aperture as a function of these
parameters and the light measured.
The flash meter waits for a flash of lightning before taking the measurement, so the flash must be triggered manually.

Using a connected flash.
The exposure time and sensitivity are chosen by the photographer, and the light meter indicates the aperture as a function of these
parameters and the light measured.
The flashmeter triggers the flash and takes the measurement. The flashmeter must be connected to the flash by a cord.
This solution is rather impractical.

Using a radio-controlled flash.
The exposure time and sensitivity are chosen by the photographer, and the light meter indicates the aperture as a function of these
parameters and the light measured.
The flashmeter sends the radio signal to trigger the flash and takes the measurement. This requires a flash that is compatible with
the flashmeter signal. Studio flash units are generally the best choice for this purpose.
The retractable dome.
Some flashmeters have a hemispherical cover that can be extended or retracted. The position of this dome changes the angle of vision of the cell.
The dome is out.
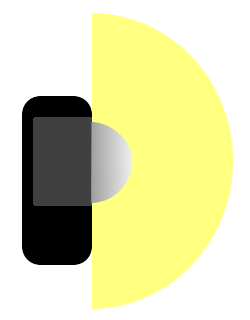
The cell "sees" everything around it, with an angle of vision of 180° or almost.
Le dôme est rentré

The cell only "sees" what is in the axis. The angle of vision is much smaller.
In the studio, the retracted dome flashmeter is used to measure each source separately.
The extended dome flashmeter is preferred for determining the exposure with all the sources switched on.
The dome is then positioned in the direction of the camera.
A small experiment about reflected light.
We said that the measurement of reflected light lacks precision because its result depends on the colour of the subject being photographed. Here's a little experiment to highlight this problem. You'll need a white surface and a black surface. If you have access to a studio, black and white backgrounds will do just fine. If not, try to find a white wall, a classroom blackboard, etc.
- Set your camera to automatic or semi-automatic (shutter speed or aperture priority, it doesn't matter).
- Take a photo of the white surface, getting close enough so that the viewfinder is filled with white.
- Do the same with the black surface.
If you compare the two photos, you may be surprised to find that they are almost identical : they both show a grey surface. The histograms are also very similar, showing a peak in the middle, i.e. in the grey area.

Histogram of the white picture

Histogram of the black picture
How to explain this ?
First of all, we need to explain how your camera 'thinks'. In principle, the photos you usually take have light areas (the sky, water, etc.) and dark areas (under trees, the ground, etc.) the camera takes an average of these luminosities and calculates the settings so that this average is in the middle of the histogram. Which is a good choice in most cases.
But in the case of an all-white photo, the average corresponds to the luminosity of the white. The parameters calculated by the camera will therefore place this white in the middle of the histogram, i.e. in the grey zone. And of course the same thing happens for the black photo.
This little experiment shows that the measurement of reflected light is strongly influenced by the colour of the subject. If you have a cell, measure the incident light, set your camera to manual mode and transfer the settings calculated by your sensor. This time you will obtain a white photo and a black photo : the incident light measurement is not affected by the colour of the subject.

If you liked this page, share it on your favorite network :