Portrait lighting (tutorial).
Portraiture is undoubtedly a photographic genre in its own right, although the photos that fall into this category can be of very different kinds : from the studio to the natural setting, from the spontaneous to the posed photo, from the wedding to the editorial photo, from the selfie to the Harcourt studio portrait, all these images have in common the fact that the subject is a person.
As in any photograph, but perhaps even more so in a portrait, light plays a very important role in shaping the face and, to a certain extent, bringing out the personality of the subject.
It's the photographer's job to observe the light.
The person being photographed may not realise that a hand or a lock of hair is casting a shadow on their face. The photographer, if he pays attention to these problems, is in a better position to see and correct them. It is often enough to ask the person being photographed to turn their head a little or to lower their hand to resolve a shadow problem. In the studio, it's also easy to move the light sources around.
Let's talk about shadows.
Without light, there can be no photography. Without light, there are no shadows. These three concepts are intimately linked. Photographers need to know how to observe shadows in order to either eliminate them or use them to their advantage. This mini-tutorial will teach you how to observe and use shadows to improve your portraits.
The human body has a complex shape. The face in particular, with its nose, sockets, mouth and chin, is particularly tortured. On these complex shapes, light and shadow can make something very harmonious or, on the contrary, very unattractive.
Two types of shadow.
Shadows can be divided into two categories: cast shadows and shape shadows. Cast shadows are those that an object (or part of the subject) casts on another object. The nose is particularly good at creating this kind of shadow, but strands of hair are not bad either. A hand raised to face level also creates a cast shadow. Shadows of this type need to be positioned precisely, or even eliminated where possible.
Shape shadows are caused by the curvature of a shape, which means that one side is less well lit than the other. Shadows of this second type are useful to the photographer : they create the impression of volume in a photo, which by definition is two-dimensional.

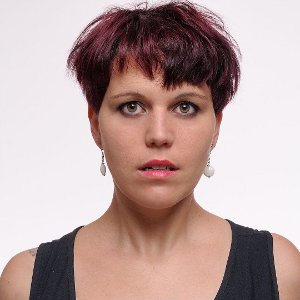
Portrait of Anna, with cast and shaped shadows.
In this portrait of Anna, the cast shadows have been well managed : The shadow on the nose is small and naturally placed ; The shadows of the necklace and the hair add depth. As for the shadows, they are soft and draw well the shape of the face and chest. The roundness of the arm is also perceptible thanks to the shape shadows.
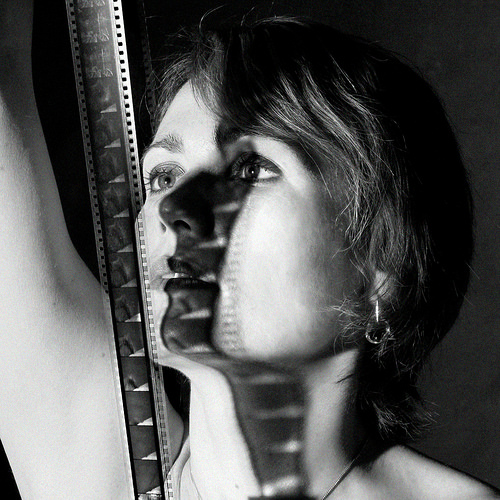
We said earlier that we should limit cast shadows. However, with a little imagination and the inspiration of Helmut Newton, my friend Claude has taken advantage of a cast shadow to produce a highly original photo. (see sa galerie sur Flickr)
Lighting concepts for portraits.
The complex shapes of a face can be enhanced by good lighting. On the other hand, ill-conceived or ill-adapted lighting can be catastrophic. Outdoors, or more generally in natural light, we are obliged to work with the ambient light, but in the studio, the photographer has complete freedom to modify, direct and shape the light. It would be a shame to do without it. Let's start with a few basic notions and the vocabulary that goes with them.
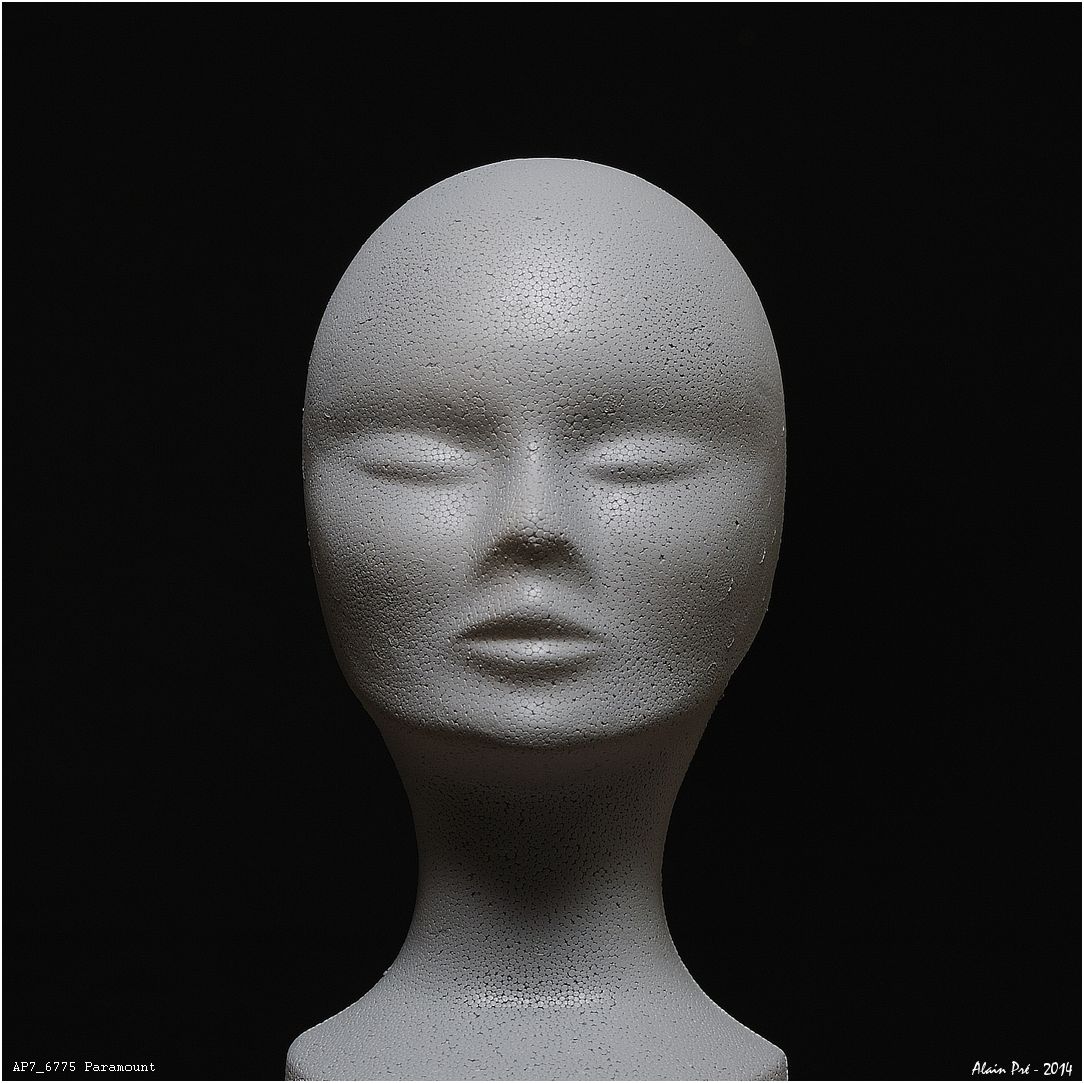
The face shown below is made of polystyrene. You can therefore be sure that its expression will not change from one photo to the next. However, as you will see, changing the lighting can radically alter the result.
In the examples below, the main light is on the left. A reflector has been placed on the right to reduce shadows. Of course, most lighting schemes include several sources, but the position of the main light is fundamental: it models the face and restores its shape. Complementary light sources have other roles and must not interfere with the main light in terms of shaping the face.

Soft or flat lighting: avoid
Soft lighting does a poor job of revealing the shape of the face.
That's what you get when you use non-directive light, which comes from all over the place.
There is also flat lighting when the light source is placed in the camera-subject axis, which is the case with the built-in flash.
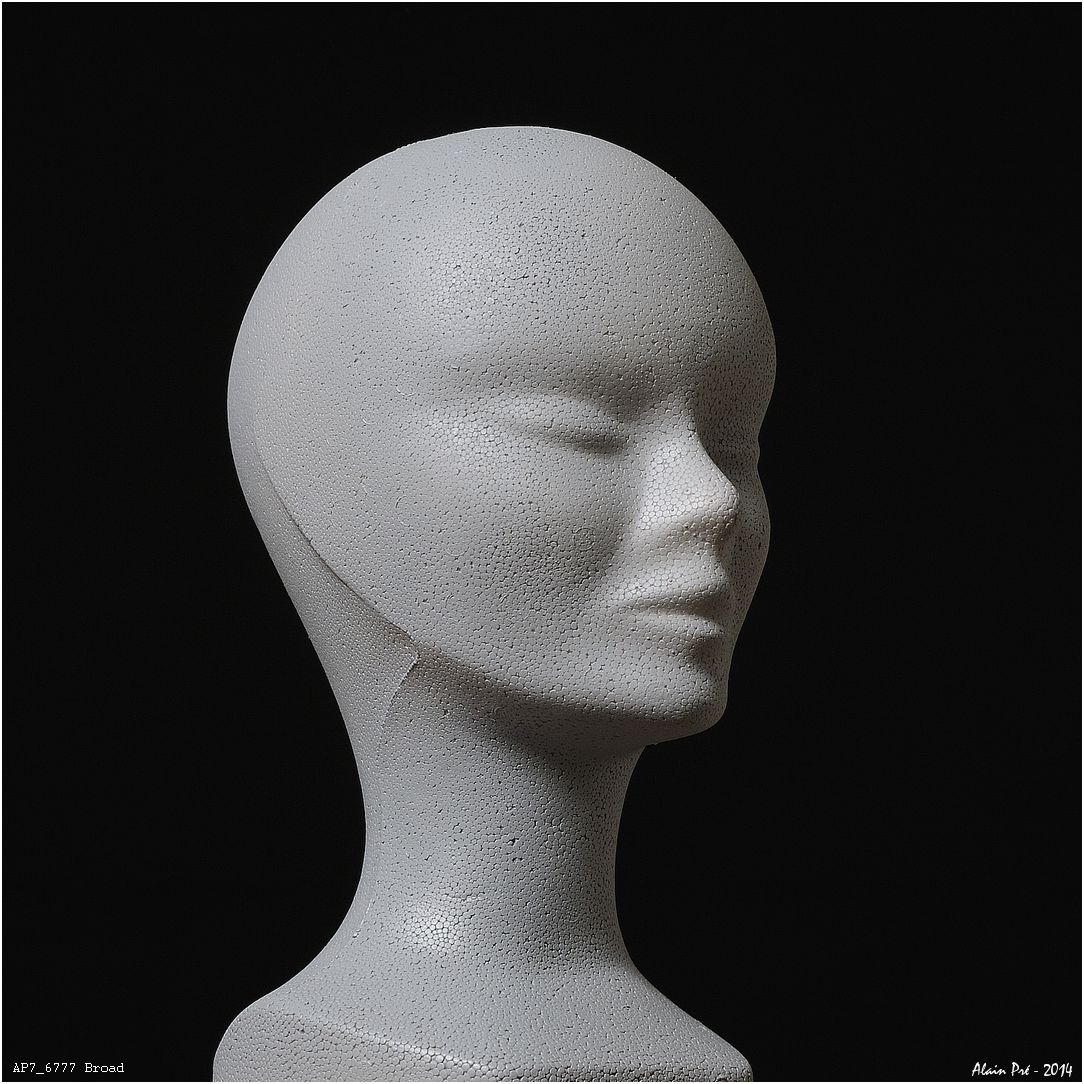
Broad lighting : the light illuminates the side of the face facing the camera.
This type of lighting should be avoided for more round faces.
Position of the main light source for
broad lighting.

Short lighting : the light illuminates the side of the face that is partly hidden from the camera.
This is the opposite of the previous.
Position of the main light source for
short lighting.
Chiaroscuro lighting : the light source(s) are placed behind the subject, illuminating it from behind. The face will be in shadow: this type of lighting is rarely used for a portrait. It is best used for a nude.

Arrangement of the main light source(s) for chiaroscuro lighting.
In addition to the Broad and Short families, the precise positioning of the main light source
defines the lighting scheme, i.e. a certain distribution of shadows and illuminated areas on the face.
Four schemes are usually distinguished: Split, Loop, Rembrandt and Paramount.
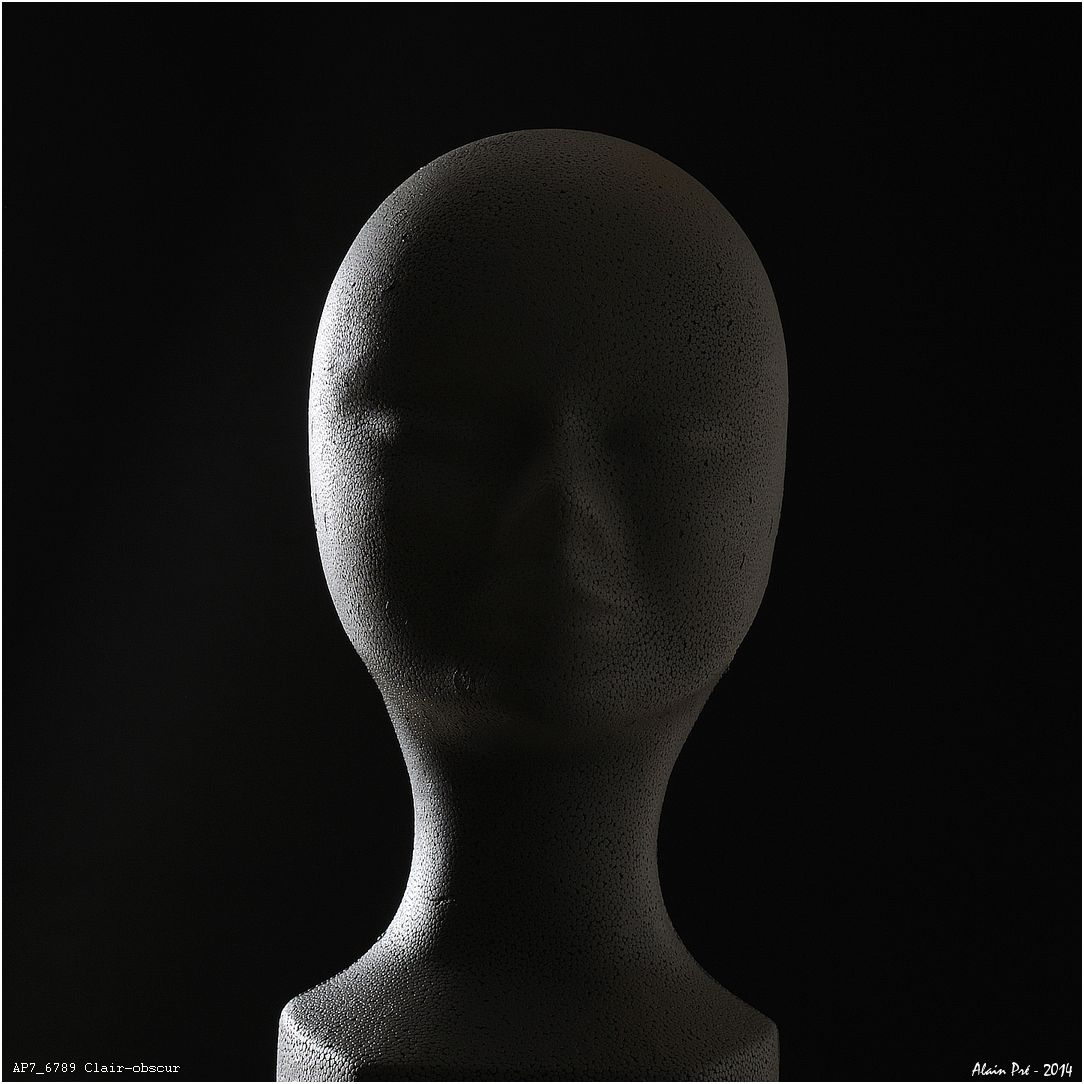
Split lighting.
The main light source is located at approximately 90° to the axis of the face, and at the same height as the face. This arrangement is rarely used in portrait shorts because only a very small part of the face is lit: the lighting is almost chiaroscuro.
This lighting scheme is easy to recognise: the face is cut symmetrically into a lit part and a part left in shadow.
Split lighting adds a sense of mystery to portraits, as only half the face is clearly visible. It should also be noted that it tends to bring out wrinkles and skin blemishes because of the low-angled light the face.
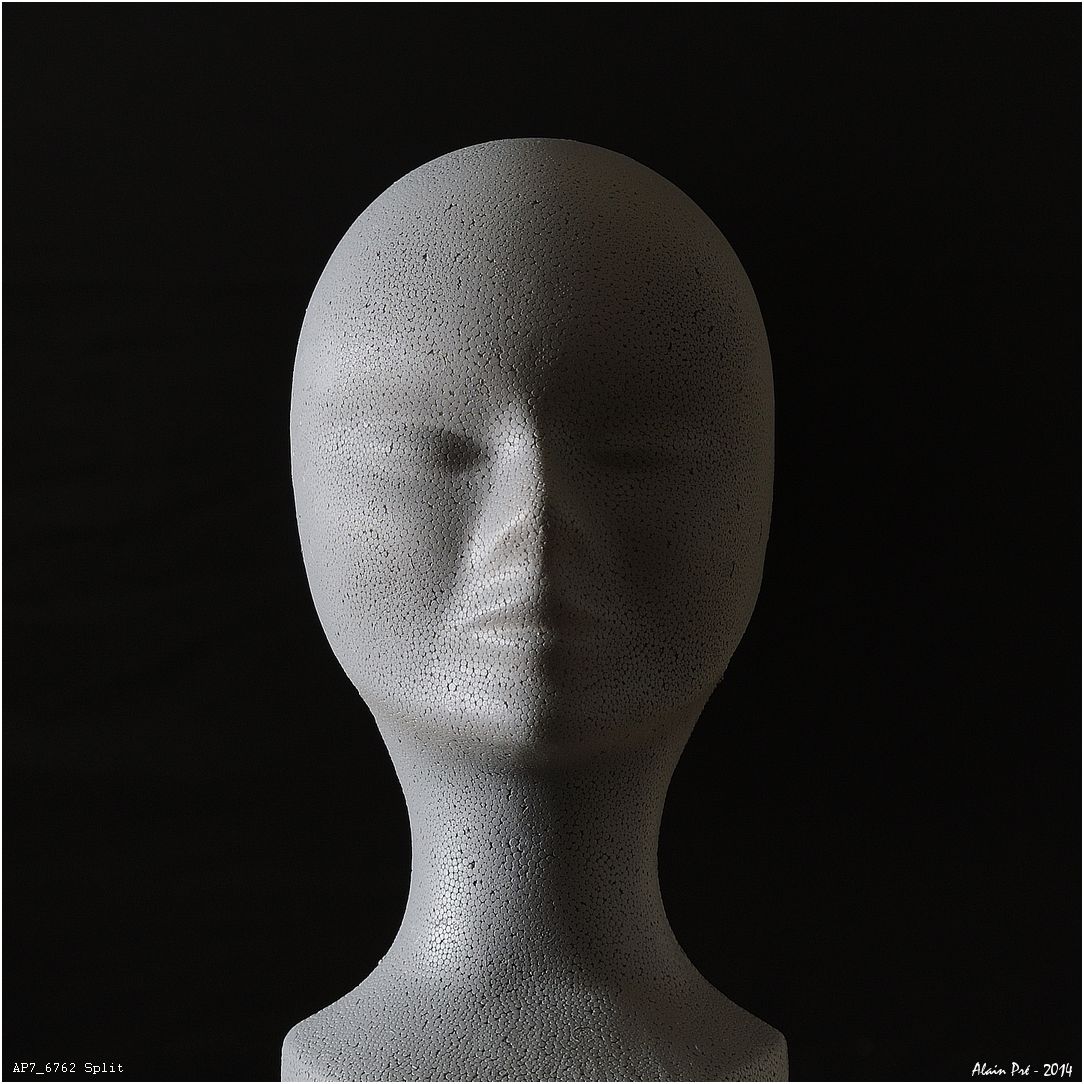
split lighting

Diagram for split broad lighting
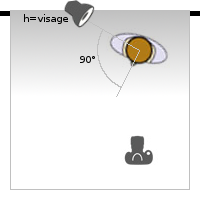
Diagram for split short lighting
Loop lighting and Rembrandt lighting.
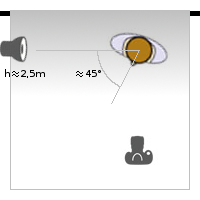
The main light source is located at approximately 45° to the axis of the face and should be positioned considerably higher than the face, so as to give the shadows a natural look, as if they were created by the sun.
These two lighting schemes (Loop and Rembrandt) are very close to each other: sometimes the model just needs to turn his head to switch from one to the other. In the case of the Loop, the shadow of the nose should be directed downwards and be short: it should not reach the upper lip.
Rembrandt lighting is easily recognised by the triangle-shaped spot of light that appears on the unlit side of the face. This area of light should encompass the eye and cover part of the cheek, without extending beyond the length of the nose. As you can see, this is all very formal. This illuminated area is delimited by the shadow cast by the nose and the shape shadow on the cheek. Note that with certain face shapes the Rembrandt triangle is difficult, if not impossible, to achieve. This scheme takes its name from the famous painter, many of whose paintings show this light configuration.
Loop lighting and Rembrandt lightin are two schemes widely used in portraiture.

Loop lighting
the shadow of the nose is directed downwards, does not reach the upper lip and does not merge with the shadow on the cheek.

Arrangement of the main source for loop broad lighting.
Arrangement of the main source for loop short lighting.

Rembrandt lighting
The shadow of the nose merges with that of the cheek to form a triangle of light that encompasses the model's eye.
Butterfly lighting.
The main light source is located high up, well above the face and exactly in line with it. If the model is facing the camera, the light source should be behind or in front of the photographer. In this case, an offset crane-type support is essential to prevent the stem of the tripod from ending up in front of the lens.
Butterfly lighting is easy to recognise by the symmetry of the shadows on the face, and the characteristic shadow that forms under the nose in the shape of a butterfly, hence the name "Butterfly".
This pattern enhances symmetrical, elongated faces; it should be avoided on round faces as it accentuates the roundness. It also highlights make-up.
Butterfly lighting
The shadows are symmetrical and the one below the nose is shaped like a butterfly, hence the name "butterfly".
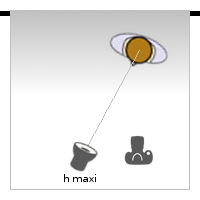
Positioning the main light source to obtain butterfly lighting.
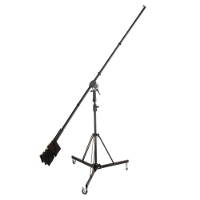
Remote stand for Butterfly lighting.
Main source on right or left ?
The diagrams shown here are obtained with the main light source on the left of the camera (i.e. on the right of the model). Of course, each of the diagrams can be obtained symmetrically by placing the light source on the other side.
The choice of placing the main source on the right or left can be made by considering the following points:
- Defect on one side of the face (pimple, small scar, etc.): we try to place the defect on the unlit side..
- Studio configuration. For example, if one of the walls is coloured, it is essential to avoid directing the light onto this wall. So place the main source on the side of the wall to direct the light onto the other side.
- Reading the image. A face, and especially a gaze, turned towards the right of the image suggests a mind turned towards the future. Conversely, a face turned to the left suggests a person thinking about the past.
These criteria sometimes conflict with each other, so a compromise has to be made. As far as reading the image is concerned, it is always possible to turn the photo over on the computer to direct the eye at will to the right or to the left.
A few additional comments.
Broad" and "Short" refer to the position of the face in relation to the camera, while 'Split', 'Loop', 'Rembrandt' and 'Butterfly' refer to the position of the face in relation to the main light source.
In practice, the source is positioned approximately where you want it. by asking the model to turn its head slightly to the right or left.
Contrast is the difference in brightness between the lighted and dark sides of the face. This can be reduced by using a reflector or a second light source. But in all cases, this other source must not create shadows on the face; it should simply reduce the shadows created by the main source.

If you liked this page, share it on your favorite network :