Tutorial: Introduction to studio photography.
The first attempts at studio photography with flashes are generally quite unsettling. First of all, you have to adjust your exposure manually. But many other reflexes and habits will have to be forgotten, such as circling around the subject to find the best angle for the shot.
The approach.
The studio is the world of precision. Everything has to be perfect, and if something goes wrong, the photo is corrected and redone. This is the opposite of other photographic genres, such as street photography, where the opportunity for a photo only presents itself once.
While some studio photos may appear spontaneous, it's important to realise that they are probably the result of a great deal of trial and error, and of directing the models to achieve just that spontaneity.
The photographer's position.
The background-model-photographer axis is very rigid: it's not possible to turn around the subject, as we recommend when shooting outdoors. when shooting outdoors. If the photographer moves too far to the right or left, the background will not be wide enough and the support or wall will be visible.
In the studio, to change the angle of the shot, we ask the subject to turn around (if it's an object, we reposition it accordingly).

The photographer is well aligned with the model.

The photographer is offset from the axis : the background border may be visible in the photo.
The position of the model.
Nor should the model move. If the subject moves closer to the flash, it will be more brightly lit; if it moves further away, it will be less brightly lit. This is very sensitive: moving from 1m to 1.40m divides the light by 2. The same applies if the person is sitting down or lying on the floor: the light will have to be measured again.
Exposure is set manually (1).
Automatic or semi-automatic exposure modes don't work because flashes unknown to the camera are triggered at the last moment. So it's impossible to use 'shutter priority', 'aperture priority', 'full auto', 'iso auto', etc. To the best of our knowledge, there are no studio flashes that can be used automatically, as is the case with some cobra flashes TTL.
The camera should therefore be set for manual exposure mode. However, the parameters are easy to determine:
- Sensitivity should be set as low as possible to minimise noise (ISO 100 or 200).
- Le temps de pose n'a aucune importance tant qu'il reste en dessous de la vitesse de synchro flash, et à condition que le studio soit assez sombre. For example, choose 1/125th or 1/200th of a second.
- The aperture is chosen by the photographer according to the desired effect. The power of the flash(es) is then adjusted according to this choice. A simpler solution would be to measure the light emitted by the flashes and set the aperture accordingly, but this solution is not as good because it introduces an imposed parameter that has not been decided, which is contrary to the spirit of studio work.
- Being in manual mode, the type of measurement (spot, weighted...) is of no importance.
- See also the tutorial on measuring light with a flash meter.
Focusing (1).
You can still use automatic focusing, but some cameras have difficulty in slightly dark studios. It is always possible to focus manually or to increase the power of the modelling lights to make the auto-focus process easier.
White balance.
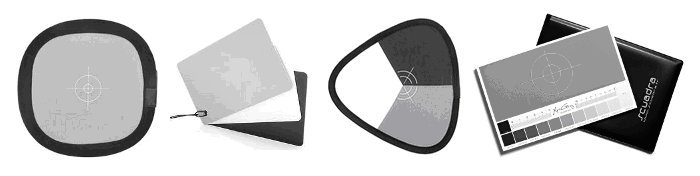
You can set the white balance to 'Flash' without too much risk. But for greater precision, it's advisable to take a test photo with a grey scale (and of course to shoot in RAW).
The flash trigger (or transmitter) (1).
Even if the camera has no idea which flashes are being used, it still has to be able to trigger them. There are several solutions:
- The cord. A bit old-fashioned, impractical and dangerous, at least for the equipment: it's easy to get your feet caught in these wires, especially since a photo studio is often in semi-darkness.
- The infrared trigger, which doesn't work well outdoors, and only allows very basic flash control.
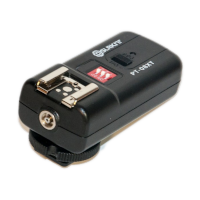
- Finally, the most common: the radio trigger, which allows you to trigger all the flashes or just some of them. It is also sometimes possible to remotely control the main flash settings.

Multiblitz infrared flash trigger
Neewer radio flash trigger
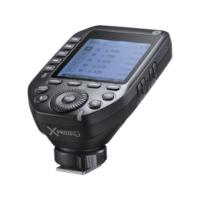
Godox radio flash trigger
- See also the tutorial on triggering remote flashes.
The black studio test.
Each session should begin with a studio black test to ensure that the ambient light will not be visible in the shots. Of course, if you're in your usual studio, where you know the settings well, you don't have to do this test every time. But make sure that the sun doesn't create a rectangular patch of light (depending on the shape of the window) on the floor or back wall. These defects may not be easy to see on the back of the camera, but they will be clearly visible in the final photo.
How to do the black studio test ?
- Set the parameters decided for the shot on the camera : sensitivity, aperture and exposure time.
- Take a photo without using the flashes. This photo should be perfectly black. If this is not the case, either close the blinds if the windows are fitted with them, or change the shooting parameters: reduce the exposure time, and/or the aperture of the diaphragm.
If this test is correct, the session can begin, without the need to plunge the studio into semi-darkness, which would have at least two disadvantages: the risk of getting your feet caught in a cable (with probable financial consequences), and secondly, the camera's autofocus could malfunction, forcing you to focus manually.
Notes.
(1) Note: the chapters marked (1) only apply to studios equipped with flashes, but LED continuous light sources are becoming increasingly common and are undoubtedly easier to use for beginners. In fact, with continuous light, it is possible to use automatic or semi-automatic exposure modes, although this is not recommended. And, of course, there's no need to use a shutter release.

If you liked this page, share it on your favorite network :